Una caja rara vez es sólo una caja. En el mundo de la gran distribución, la exposición museística o el coleccionismo personal, un contenedor es un marco, un escenario y un guardián. Debe presentar su contenido con una claridad impecable y, al mismo tiempo, protegerlo del mundo exterior. Aunque existen soluciones estándar, a menudo suponen un compromiso en cuanto a tamaño, calidad o función. Para un ajuste perfecto, una estética profesional y una calidad sin concesiones, la respuesta está en la ingeniería de un caja acrílica personalizada.
No se trata de un simple proyecto de bricolaje con un tubo de pegamento. La creación de un caja acrílica personalizada es un ejercicio de fabricación de precisión, ciencia de los materiales y acabado meticuloso. Implica comprender las propiedades fundamentales del acrílico, seleccionar los materiales y técnicas adecuados para el trabajo y ejecutar cada paso con precisión de ingeniería. El objetivo es crear un objeto en el que las costuras sean invisibles, los ángulos perfectos y la claridad absoluta: un recipiente transparente que realce lo que hay dentro en lugar de distraer la atención.
Esta guía definitiva le guiará a través de todo el proceso, desde el concepto inicial hasta el pulido final. Exploraremos la ciencia que hay detrás de la selección de materiales, la física del corte de precisión, la química de la unión y el arte del acabado. Tanto si es usted un diseñador que necesita una serie de expositores a medida para una tienda, un conservador que protege un artefacto de valor incalculable o un fabricante especializado que busca resultados profesionales, éste es su plan para conseguir la transparencia de la ingeniería.
Índice
Fase 1: El proyecto de ingeniería - Diseño y planificación
Antes de tocar una sola pieza de acrílico, se realiza el trabajo más crítico: la fase de diseño e ingeniería. Un plan defectuoso garantiza un resultado defectuoso. Esta fase consiste en definir el propósito y traducirlo en un diseño preciso y fabricable.
Definir el objetivo y los requisitos de rendimiento
La primera pregunta es siempre: ¿Para qué sirve esta caja? La respuesta dicta todas las decisiones posteriores.
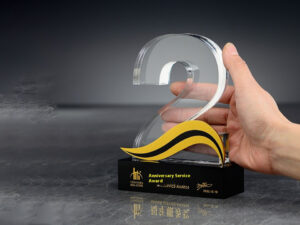
- Expositor de venta al por menor: A caja acrílica personalizada para un bolso de lujo tendrá requisitos distintos que uno para pequeños componentes electrónicos. Tiene que ser visualmente impactante, lo bastante robusto para un entorno de mucho tráfico y tal vez incorporar características como cerraduras o marcas.
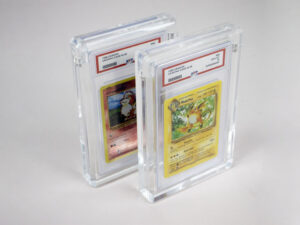
- Vitrina del museo: En este caso, las principales preocupaciones son la seguridad y la protección de los archivos. La caja debe estar fabricada con materiales inertes, ofrecer protección UV para evitar la decoloración y ser estructuralmente sólida para protegerla de accidentes. El Instituto Americano para la Conservación (AIC) hace hincapié en estos recintos de protección.
- Colección personal: Una caja para un balón de fútbol firmado o una colección de especímenes minerales puede priorizar la claridad y un ajuste perfecto, con menos énfasis en la seguridad resistente de un accesorio de venta al por menor.
- Cubierta para equipos industriales/laboratorios: En este caso, la función triunfa sobre la forma. La caja debe tener las dimensiones exactas para encajar en la maquinaria, ser duradera y, tal vez, resistente a productos químicos específicos.
La ciencia del grosor: Una decisión estructural
Elegir el grosor de la lámina acrílica no es sólo una elección estética; es una decisión de ingeniería estructural. El grosor necesario depende del tamaño total de la caja, el peso del contenido y el uso previsto.
- 3/16″ (4,5 mm): Un buen grosor polivalente para cajas pequeñas y medianas (por ejemplo, de hasta 12x12x12 pulgadas) que no contengan objetos pesados. Ofrece una sensación de solidez sin ser demasiado voluminosa.
- 1/4″ (6 mm): Se trata de la norma del sector para productos de alta calidad de tamaño mediano y grande. cajas acrílicas personalizadas. Proporciona una excelente rigidez, un aspecto y un tacto de primera calidad, y es adecuado para la mayoría de los fines de venta al por menor y de exposición.
- De 3/8″ (9,5 mm) a 1/2″ (12,7 mm) y más gruesas: Reservado para cajas muy grandes, aplicaciones que soportan peso (como pedestales o mesas), o cuando se desea una estética “gruesa” de gama alta. Estos grosores también se utilizan para aplicaciones especializadas, como acuarios o armarios resistentes a la presión.
Si se utiliza una lámina demasiado fina para una caja grande, se producirá una curvatura o flexión que no sólo parecerá barata, sino que además someterá a una enorme tensión las costuras pegadas, con el riesgo de que acaben fallando.
Del boceto al CAD: Garantizar la precisión
Aunque un boceto a mano es ideal para las ideas iniciales, la fabricación profesional se basa en Diseño asistido por ordenador (CAD). Un dibujo CAD traduce el diseño en un archivo digital preciso que especifica cada dimensión con una precisión de milésimas de pulgada. Este archivo puede introducirse directamente en las máquinas de corte CNC, garantizando que los cinco o seis lados de la caja se cortan con una precisión perfecta. Sin este nivel de precisión, es casi imposible conseguir el ajuste sin huecos necesario para unas costuras resistentes e invisibles.
Fase 2: Dominio del material - Selección y corte
Una vez establecido un plan sólido, la siguiente fase consiste en seleccionar el tipo de acrílico adecuado y cortarlo con una precisión sin concesiones.
La elección fundamental: Acrílico moldeado frente a acrílico extruido
No todos los acrílicos son iguales. Hay dos métodos principales de fabricación -fundición y extrusión- y la elección tiene implicaciones significativas para un producto. caja acrílica personalizada.
- Acrílico extruido: Fabricado empujando acrílico fundido a través de una matriz, es la opción más económica. Tiene un punto de fusión más bajo y es más propenso a las tensiones de fabricación. Es adecuado para proyectos sencillos, pero su menor resistencia química lo convierte en una mala opción para la soldadura por disolvente de alta resistencia.
- Acrílico fundido: Se fabrica vertiendo monómero líquido entre dos láminas de vidrio y curándolo en un baño caliente. Este proceso produce una hoja más dura, químicamente más resistente y ópticamente más clara. Es la mejor opción para cajas acrílicas personalizadas porque permite obtener costuras soldadas con disolvente más resistentes y limpias y es más fácil de pulir hasta conseguir un alto brillo.
| Característica | Acrílico moldeado | Acrílico extruido |
|---|---|---|
| Proceso de fabricación | Monómero vertido y curado en un molde | Polímero fundido empujado a través de una matriz |
| Resistencia química | Excelente (Ideal para soldadura con disolvente) | Buena (más propensa a agrietarse) |
| Tolerancia de grosor | Menos coherente | Más coherencia |
| Dureza/Resistencia a los arañazos | Más duro y más resistente a los arañazos | Más blando y se raya más fácilmente |
| Corte/grabado por láser | Produce un grabado limpio y esmerilado | Produce un grabado claro y menos definido |
| Coste | Más alto | Baja |
| Lo mejor para | Cajas personalizadas de alta calidad, pantallas, pulido | Acristalamiento general, doblados sencillos, proyectos presupuestarios |
Para cualquier proyecto en el que la calidad, la claridad y la durabilidad sean primordiales, el acrílico fundido es la elección inequívoca.
El corte de precisión: Creación de bordes perfectos
La fuerza y la belleza de una caja acrílica personalizada nacen en los bordes. Cada corte debe ser perfectamente recto, liso y cuadrado.
- Fresado CNC: El estándar profesional. Una fresadora CNC utiliza un archivo CAD digital para cortar cada panel con precisión robótica. Este método garantiza que todos los paneles sean idénticos y cuadrados, lo que es fundamental para el montaje. El acabado de los bordes es mate, limpio y mecanizado, perfecto para el encolado.
- Corte por láser: Para diseños intrincados o cuando se desea un borde prepulido, una cortadora láser es ideal. Corta con un haz de luz, vaporizando el material para crear un borde limpio y pulido a la llama. Es excelente para tapas o elementos decorativos.
- Sierra de mesa: Para bricolaje o cortes rectos sencillos, una sierra de mesa bien equipada puede funcionar. La clave está en utilizar la hoja adecuada: una hoja de gran número de dientes (80-100T) con un perfil de afilado triple (TCG) es esencial para evitar el astillado y el agrietamiento. El borde cortado será áspero y requerirá un lijado y pulido considerables antes del encolado.
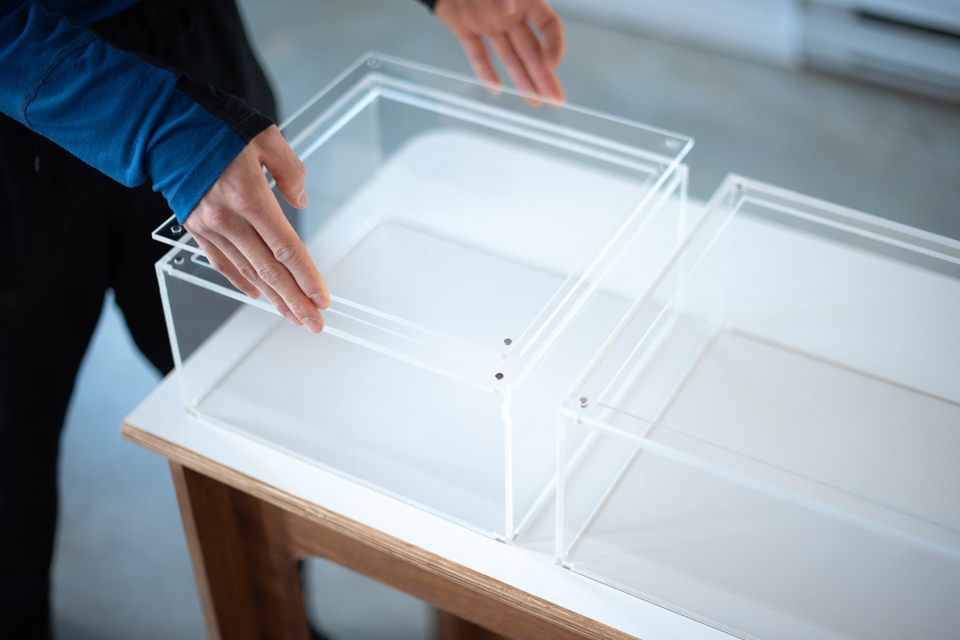
Fase 3: El momento de la verdad - Montaje y unión
Esta es la fase más crítica y que requiere más habilidad. Una ligera desalineación o una unión incorrecta arruinarán toda la pieza. El objetivo es crear uniones que no solo sean estructuralmente sólidas, sino también ópticamente invisibles.
La base de una costura impecable: Preparación de los bordes
No se puede pegar un borde rugoso o desigual. Antes de aplicar cualquier agente adhesivo, los bordes cortados (especialmente de una sierra) deben estar preparados.
- Empalme/Lijado: El canto debe quedar perfectamente plano y liso. Esto puede hacerse en una ensambladora (para obtener un borde perfectamente cuadrado) o lijando a mano con cuidado sobre una superficie plana, pasando progresivamente por granos más finos de papel de lija.
- Limpieza: Los bordes y las zonas circundantes deben limpiarse meticulosamente con alcohol isopropílico para eliminar el polvo, los aceites o los residuos que puedan interferir en la unión.
- Retira la máscara: La película protectora de las láminas acrílicas debe dejarse el mayor tiempo posible para evitar arañazos. Justo antes de pegar, despegue con cuidado la película a unos dos centímetros del borde que se va a unir.
La ciencia de la costura: Soldadura con disolvente
Esto es lo que diferencia a los profesionales cajas acrílicas personalizadas de los intentos de aficionados. No se trata de pegar, sino de una fusión química.
- La química: Disolventes finos similares al agua, como los fabricados por Corporación IPS (Weld-On), . Estos disolventes actúan disolviendo temporalmente la superficie del acrílico moldeado. Cuando se presionan dos de estas superficies, las cadenas de polímero de cada pieza se entremezclan. El disolvente se evapora rápidamente y las cadenas se entrelazan de forma permanente, fusionando los dos paneles en una única pieza continua de acrílico.
- La técnica (acción capilar): Las piezas se mantienen perfectamente unidas en una plantilla. Se utiliza un frasco aplicador especial con una punta de aguja fina para aplicar una pequeña cantidad de disolvente a las en costura. Acción capilar-la tendencia de un líquido a introducirse en un espacio estrecho- hace que el disolvente penetre profundamente en la junta, llenándola por completo y creando una unión sin burbujas, ultrarresistente y ópticamente invisible. Esto requiere una mano ligera y firme y un ajuste perfecto y sin huecos entre los paneles.
La plantilla está lista: ángulos perfectos
Las manos humanas no pueden sujetar dos paneles en un ángulo perfecto de 90 grados con la presión constante necesaria para que se cure una soldadura con disolvente. Este es el trabajo de una plantilla. Se puede hacer una plantilla sencilla con trozos de madera o bloques de metal sujetados a un banco de trabajo plano para crear un ángulo recto perfecto. Los paneles acrílicos se colocan en la plantilla, asegurándose de que estén bien sujetos y perfectamente alineados mientras se aplica el disolvente y se endurecen (lo que puede llevar segundos para una unión inicial, pero hasta 24-48 horas para una resistencia total).
Fase 4: Más allá de la caja - Acabado y personalización
Una caja perfectamente montada es un gran logro, pero el trabajo no ha terminado. Los toques finales y los elementos personalizados son los que convierten un simple contenedor en un producto a medida.
Tapas, bisagras y complementos funcionales
A caja acrílica personalizada puede ser mucho más que un cubo de cinco caras. Las adiciones comunes incluyen:
- Tapas: Tapas tipo caja de zapatos, tapas correderas o tapas con un simple orificio para levantarlas fácilmente.
- Bisagras: Se pueden añadir bisagras acrílicas o metálicas para crear una puerta funcional.
- Cerraduras: Las cerraduras de leva pueden instalarse como medida de seguridad en comercios o expositores.
- Bases: La caja puede adherirse a una base acrílica más gruesa y coloreada o a una base de madera personalizada para conseguir un aspecto más sofisticado.
El arte de la personalización: Grabado e impresión
- Grabado por láser: Se puede utilizar un láser para grabar logotipos, texto o diseños complejos en la superficie del acrílico. Es perfecto para marcar, etiquetar o añadir un toque decorativo.
- Impresión UV directa: Las impresoras planas modernas pueden imprimir gráficos de alta resolución a todo color directamente sobre la superficie acrílica. Esto permite obtener efectos visuales impresionantes y una personalización completa de los expositores de marketing.
El pulido final: Creación de bordes como gemas
Los bordes superiores de una caja abierta o los bordes de una tapa deben estar acabados para que coincidan con la claridad de la cara acrílica.
- Pulido: El método más profesional. El borde se lija suavemente y luego se pule con un disco de pulido de alta velocidad con compuestos especiales. De este modo se obtiene un borde perfectamente nítido, impecable y con aspecto de gema.
- Pulido a la llama: Un método más rápido en el que se pasa un soplete especializado por el borde, fundiendo la superficie hasta conseguir un acabado transparente. Aunque es eficaz, requiere gran habilidad y puede inducir tensiones en el material si se hace incorrectamente.
Fabricación profesional frente a bricolaje: Una comparación realista
¿Debería contratar a un fabricante profesional o intentar construir su propio caja acrílica personalizada? Este cuadro desglosa las realidades de cada enfoque.
| Factor | Fabricación profesional | Enfoque DIY |
|---|---|---|
| Equipamiento | Fresadoras CNC, cortadoras láser, acabadoras de cantos, plantillas profesionales | Sierra de mesa, herramientas manuales, plantillas básicas |
| Precisión | Extremadamente alto (hasta +/- 0,005″) | Variable; depende en gran medida de la habilidad y las herramientas |
| Calidad de la costura | Ópticamente invisible, Soldaduras sin burbujas | Difícil de conseguir; riesgo de burbujas, líneas de cola visibles |
| Coste del material | Acceso a precios al por mayor de acrílico moldeado | Precios de venta al público más altos para cantidades más pequeñas |
| Coste total | Mayor desembolso inicial (mano de obra + materiales) | Menor coste de material, pero mayor “coste” en tiempo y posibles errores |
| Tiempo | Entrega rápida para una o varias unidades | Lleva mucho tiempo, sobre todo los pasos finales |
| Lo mejor para | Necesidades empresariales, pantallas de gama alta, calidad garantizada | Proyectos de hobby, prototipos, aprendizaje del oficio |
Preguntas más frecuentes (FAQ)
P1: ¿Puedo hacer una caja acrílica a medida con super glue? A: No. El superpegamento (cianoacrilato) es la elección equivocada. Crea una unión débil y quebradiza y, lo que es más importante, los vapores provocarán “cuarteamientos” (una red de pequeñas grietas) en la superficie acrílica, arruinando su aspecto. Debe utilizar un cemento acrílico al disolvente adecuado.
P2: ¿Cuál es la mejor manera de limpiar mi caja acrílica personalizada? R: Utilice un paño de microfibra suave y limpio con un poco de jabón suave y agua tibia. Limpie suavemente y seque con otro paño de microfibra limpio. Nunca utilice Windex o cualquier limpiador con amoníaco o alcohol, y evite las toallitas de papel, ya que son abrasivas y provocarán arañazos finos.
P3: ¿Cómo puedo eliminar un arañazo de mi caja acrílica? R: Para arañazos superficiales leves, se pueden utilizar compuestos acrílicos de pulido especiales (como Novus 2) con un paño suave para pulir el arañazo. Los arañazos profundos pueden requerir un lijado húmedo progresivo antes del pulido, un proceso que es mejor dejar en manos de profesionales.
P4: ¿Se puede utilizar mi caja acrílica personalizada en el exterior? R: Sí, el acrílico es resistente por naturaleza a los rayos UV y a la intemperie, lo que lo convierte en un material excelente para aplicaciones exteriores como señalización o cubiertas protectoras. Con el paso de los años, puede amarillear un poco, pero los acrílicos de alta calidad son muy duraderos.
P5: ¿Son impermeables las costuras pegadas de una caja acrílica a medida? R: Sí. Una soldadura por disolvente correctamente ejecutada funde los paneles entre sí, creando una unión impermeable y sin juntas. Por eso el acrílico es el material preferido para fabricar acuarios a medida y equipos de laboratorio.
Conclusión: El pináculo de la presentación y la protección
Creación de un verdadero caja acrílica personalizada es un testimonio del poder de la ingeniería de precisión. Es un proceso que transforma un simple material industrial en un sofisticado objeto de valor. Desde las decisiones fundamentales del plano CAD hasta la meticulosa química de una soldadura con disolvente y el pulido brillante final, cada paso es un movimiento deliberado hacia la perfección.
Aunque el bricolaje puede ser un reto gratificante, para obtener resultados que cumplan las normas comerciales, profesionales o de archivo, es esencial asociarse con un especialista en fabricación. Ellos poseen el equipo, los conocimientos y la experiencia necesarios para ejecutar el diseño a la perfección. El resultado es algo más que una caja: es un marco cristalino, estructuralmente sólido y perfectamente proporcionado que ofrece lo último en presentación y protección, permitiendo que el objeto que contiene se vea y aprecie exactamente como debe ser.