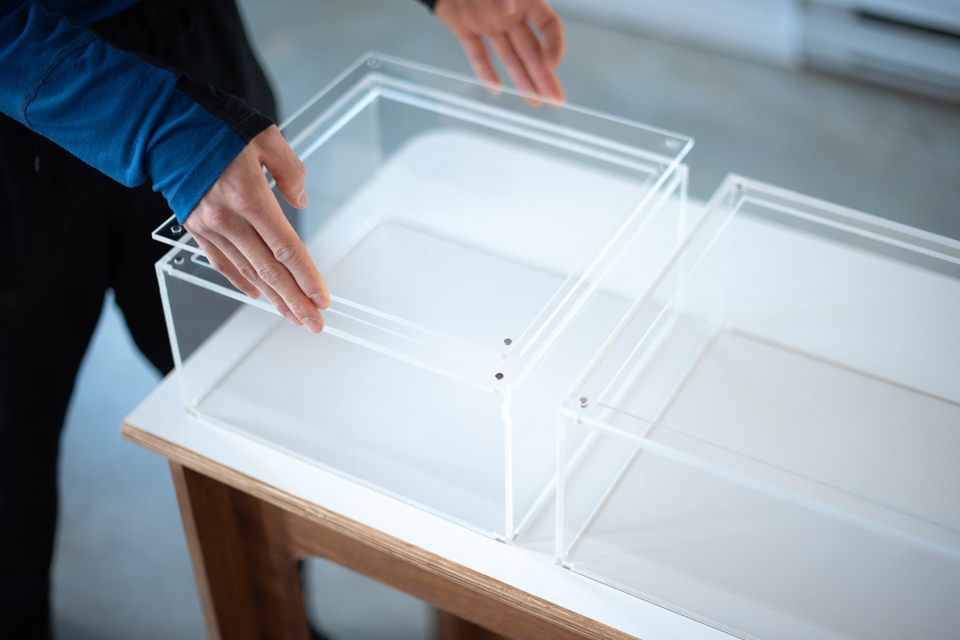
A clear acrylic box looks almost too simple to engineer.
Six transparent panels. A lid, perhaps. Maybe a few magnets, hinges, dividers, or printed graphics. How difficult could it be?
Quite difficult, once the product has to survive real production.
The difference between an attractive prototype and repeatable custom acrylic boxes often hides in details a buyer cannot see in a quotation: sheet variation, machining stress, corner geometry, adhesive selection, thermal movement, fixture accuracy, cure time, and even which edges were polished before assembly.
That is the real subject of acrylic box fabrication.
According to Technavio’s acrylic sheets market analysis(open in a new tab), the acrylic sheet market is forecast to add about USD 1.72 billion between 2025 and 2029, with a 5.8% CAGR, and the report specifically identifies display cases and retail displays among acrylic applications.
The wider PMMA sector is substantial as well. Fortune Business Insights(open in a new tab) values the global PMMA market at USD 6.11 billion in 2025 and projects USD 8.95 billion by 2034, with signs and displays listed as the leading application segment in 2025.
Those numbers explain the commercial opportunity. They do not tell you how to build a box that arrives square, stays clear, and does not start cracking at the corners three weeks later.
That part is engineering.
Start With the Application, Not the Drawing
When a buyer sends an RFQ saying, “We need a 300 × 250 × 200 mm clear acrylic box,” the specification is not finished. It has barely started.
Is 300 × 250 × 200 mm the inside dimension or the outside dimension? Does a finished product need to fit inside with 2 mm clearance or 20 mm? Will the box sit untouched in a museum, or will retail staff open it fifty times per day? Does it need to support weight? Will it be exposed to perfume, cosmetics, cleaning chemicals, humidity, sunlight, or heat?
Those questions change the construction.
For commercial custom acrylic boxes, dimensional configuration can include five-sided covers, separate bases, removable lids, hinged access, locks, dividers, printed branding, and other features. Each additional function introduces another tolerance or stress point that must be managed during fabrication.
For a simple dust cover, optical appearance may dominate the specification. For a countertop cash box, hinge strength and hardware location matter more. For a cosmetic display, the designer may care about near-invisible seams from the customer’s viewing angle. For a storage organizer, repeatable drawer clearance can matter more than an optically perfect joint.
The engineering sequence should therefore begin with function:
application → dimensions → material → thickness → fabrication process → joint design → finishing → hardware → QC
Reverse that sequence and expensive rework becomes much more likely.
Inside Dimensions and Outside Dimensions Are Not Interchangeable
This sounds elementary. It causes more trouble than it should.
Suppose a buyer needs an acrylic enclosure to fit over a display object. The object’s footprint is known, so the purchasing team sends those dimensions directly to a supplier.
Production starts.
The box arrives.
It does not fit.
Why? Because acrylic has thickness. Joint layout has thickness. A recessed base has clearance. Hinges occupy space. A sliding lid needs running clearance. Even the exact arrangement of butt joints changes the relationship between panel dimensions and finished dimensions.
A competent acrylic box design therefore needs a controlled drawing showing which dimensions are functional.
Your drawing should distinguish the required internal opening, external envelope, sheet thickness, lid overlap, base engagement, hole locations, hardware centers, and any dimensions that must be inspected after bonding.
This becomes even more important with larger custom acrylic display boxes, where tiny panel errors can stack across multiple joints and become visible as an uneven lid gap or out-of-square corner.
Cast vs Extruded Acrylic for Boxes: Which One Should You Specify?
There is no universal answer to cast vs extruded acrylic for boxes.
The correct material depends on what the box must do and how it will be fabricated.
POLYVANTIS explains that its cast acrylic offers advantages including better resistance to machining-related melting or chipping, a broader thickness range, slightly better chemical resistance, and better performance under long-term mechanical loads. Its extruded acrylic offers lower cost, tighter thickness tolerance, and faster cementing and thermoforming.
That distinction matters on a production floor.
Engineering Factor
Cast Acrylic
Extruded Acrylic
Buyer Implication
Thickness consistency
Can have wider manufacturing tolerance
Generally tighter tolerance
Extruded material can help when repetitive fit is sensitive to gauge variation
Machining behavior
Generally more forgiving during machining
More susceptible to melting if tooling or feeds are poor
Tooling and process control matter
Cementing
Typically slower
Typically cements faster
Production method and fixture time may differ
Custom colors / heavy gauges
Broad flexibility
More limited depending on grade
Cast may suit specialty visual projects
Long-term mechanical loading
Often preferred for demanding loads
Application-dependent
Do not select solely by price
Cost
Commonly higher
Commonly lower
Material savings should be weighed against fabrication requirements
This is one reason purchasing acrylic simply by “3 mm clear PMMA” is risky.
Three millimeters describes nominal thickness. It does not describe manufacturing route, grade, optical requirements, actual tolerance, surface condition, or how the material behaves in downstream fabrication.
When we review custom acrylic fabrication for storage or display products, the material decision should be tied to the finished assembly rather than treated as an isolated raw-material purchase.
Optical Clarity Is Only Part of the Specification
Buyers naturally focus on transparency because the entire point of many acrylic enclosures is visibility.
The numbers can be impressive. In its September 2024 technical documentation, ACRYLITE reports 92% light transmission for its colorless smooth extruded acrylic grade.
But a high-transmission sheet does not guarantee a high-quality finished box.
The final product can still look poor because of:
cloudy bond lines, bubbles, scratches, fingerprints trapped near the joint, chipped corners, inconsistent polishing, distortion, solvent marks, adhesive overflow, poorly aligned panels, or stress crazing.
In other words, you are not purchasing a sheet.
You are purchasing the result of several manufacturing processes applied to that sheet.
That difference matters.
Laser Cut Acrylic Boxes: Beautiful Edges Can Hide Residual Stress
CO₂ laser cutting is attractive for acrylic because it can produce complex profiles with clean, glossy-looking edges. For many geometries, it is fast and efficient.
But the visual finish tells only half the story.
ACRYLITE’s laser machining guidance(open in a new tab) explains that laser cutting locally heats and rapidly cools the acrylic edge. The manufacturer says the resulting highly stressed region may extend approximately 0.010 to 0.050 inch into the sheet, depending on thickness, and that these stressed areas can become susceptible to crazing when exposed to incompatible solvents or high mechanical stress.
That is why laser cut acrylic boxes require more thought than “cut, glue, ship.”
Recently, while reviewing acrylic-fabrication discussions online, I came across a case that should make any buyer cautious about approving a sample based on appearance alone.
A fabricator had laser-cut clear acrylic panels. The edges looked excellent—smooth, glossy, almost finished straight off the machine. Then solvent cement was introduced.
Heavy crazing and bubbles appeared around the joints.
People with practical fabrication experience immediately focused on the laser-affected edge. One suggestion was to machine roughly 1 mm from the bonding edge before joining the parts. Others discussed annealing or changing the bonding process.
The interesting part was not the glue.
It was the process sequence.
The parts looked good before bonding, yet the cutting operation had already created a condition that could undermine the next manufacturing step.
ACRYLITE’s own fabrication guidance supports the underlying mechanism: it warns that laser-cut edges carry elevated stress and says annealing should be considered when solvent cement will contact the edge.
For procurement teams, that changes the question from:
“Do you have a laser cutter?”
to:
“How do you prepare a laser-cut edge that will later be solvent bonded?”
Those are very different supplier-qualification questions.
The Unpopular Truth: A Glossy Edge Is Not Automatically a Premium Bonding Edge
Here is the opinion I wish more acrylic buyers heard before writing their specifications:
Paying for every edge to look mirror-polished can be the wrong decision.
Yes, a visible exposed edge may need an excellent optical finish.
A bonding edge has another job.
It must be flat, square, clean, low-stress, and compatible with the selected acrylic bonding techniques.
ACRYLITE’s cementing instructions are unusually direct on this point. The company recommends cleanly cut or properly machined bonding edges and specifically says not to polish edges that will be cemented, because polishing can round the edge and weaken the joint. Flame-polished edges may also craze when solvent cement contacts them.
So “polished on all edges” sounds premium on an RFQ.
It may not be premium engineering.
For a transparent enclosure, I would rather specify the correct finish by edge function: exposed visual edge, concealed bonding edge, hinged edge, machined hardware edge, or base-contact edge.
That specification is less glamorous.
It is also much more useful.
Acrylic Bonding Techniques: The Joint Is a Manufacturing Process
Acrylic boxes are often judged at the corners. Buyers want clear, straight joints without bubbles or obvious glue marks.
Achieving that consistently is not simply a matter of buying a better adhesive.
In capillary solvent cementing, a low-viscosity cement flows into the joint by capillary action. ACRYLITE notes that, when performed properly, this process can produce a strong transparent joint. But the manufacturer also emphasizes fit, clean machining, controlled spacing, fixturing, application technique, and curing.
This is where small process mistakes become very visible.
An edge that is slightly convex may contact at the center but leave gaps toward the sides. A rough edge can trap air. A panel that shifts in the fixture can create a stepped corner. Too much cement can mark surrounding surfaces. Moving the assembly too early can disturb a joint that looks set but has not developed enough strength.
ACRYLITE states that high strength in capillary-cemented joints is reached after roughly 24–48 hours, with strength continuing to build afterward.
For B2B orders, this has scheduling implications.
“Assembly finished at 3 p.m.” does not necessarily mean “ready for aggressive handling and packing at 3:10 p.m.”
Process time matters.
Thickness Should Follow Box Size and Load
“Use 3 mm acrylic” is not an engineering rule.
Neither is “5 mm is premium.”
Sheet thickness has to work with the span, unsupported area, box geometry, expected load, opening method, hardware, shipping conditions, and desired visual proportion.
A small cosmetic counter display can behave very differently from a large museum cover made from the same nominal thickness.
Larger flat panels may bow more visibly. Heavy lids impose loads on hinges. Magnet pockets remove material around local stress areas. Large access doors can rack an otherwise square enclosure.
The right answer is therefore rarely:
“Which thickness is best?”
A more useful question is:
“What thickness and joint construction keep this specific box acceptably rigid while preserving the appearance and cost target?”
For organizers and compartmented custom acrylic display boxes, internal dividers, drawers, partitions, and guides add another dimensional stack that must be considered alongside the outer enclosure.
Acrylic Moves More Than Many Buyers Expect
Acrylic looks rigid. Dimensionally, however, temperature still matters.
The ACRYLITE glazing technical guide(open in a new tab) states that its extruded acrylic sheet expands and contracts three to eight times as much as glass or metals. It gives a thermal expansion coefficient of 0.00004 in./in./°F.
The same guide gives a useful scale example: across a 100°F temperature difference, a 48-inch panel can move by about 0.20 inch.
Your desktop jewelry box probably will not experience that full condition.
But the physics still matters when boxes become larger, tightly fitted into metal frames, installed near windows, shipped between climates, or designed with close-fitting mechanical interfaces.
If a metal hinge, lock, rail, or frame allows no accommodation for movement, stress does not disappear.
It goes somewhere.
Usually into the weakest feature.
Hardware Changes the Stress Map
Once hinges, screws, locks, magnets, handles, threaded inserts, or metal brackets enter the design, the acrylic box is no longer just a bonded enclosure.
Local stress concentrations appear.
A hole too close to an edge can become a crack initiation point. Over-tightening a screw can preload the acrylic. A heavy hinged lid can repeatedly load the same region. A magnet that snaps the lid shut may generate more impact than expected.
This is why a complete acrylic box design should establish hardware position and access requirements before the panel drawings are finalized.
Do not treat hardware as a decoration added after the box has already been engineered.
It is part of the structure.
The Sample Should Validate the Process, Not Just the Appearance
A prototype sitting under showroom lighting tells you something.
It does not tell you everything.
For B2B purchasing, sample approval should verify the characteristics that mass production must reproduce: material identity, major dimensions, wall thickness, lid fit, joint appearance, squareness, hardware action, graphics position, surface condition, packing method, and any application-specific performance requirement.
A buyer should also ask a harder question:
Was this sample made using the same process intended for production?
A hand-polished prototype made by a senior technician may look perfect. If the purchase order later depends on a different cutting method, different fixture, faster bonding cycle, or different raw-material source, the sample may not represent the production process you are actually buying.
Golden samples are useful when they control production.
They are much less useful when they are treated as photography props.
What Should Be on a Custom Acrylic Box RFQ?
A strong RFQ does not need to be a 40-page specification.
It does need to remove ambiguity.
State whether dimensions are inside or outside. Identify the PMMA type or allow the supplier to recommend one based on the application. Define nominal thickness. Show the joint configuration. Mark visible edges and bonding edges differently. Specify lid type, hinges, locks, magnets, drawers, dividers, graphics, printing, engraving, and color.
Environment affects material selection, chemical compatibility, cleaning, hardware, and fabrication strategy.
Finally, define what “acceptable” means. If tiny bubbles in a rear joint are acceptable but not on the front viewing corner, say so. If dimensions control a mating product, identify them as inspection dimensions. If scratches are unacceptable on all viewing surfaces, establish that before packing.
Specifications save money when they prevent arguments, not when they merely add pages.
The Clear Blueprint Is Really Process Control
The best acrylic enclosure is not necessarily the one made with the thickest sheet, the most expensive material, or the glossiest edge.
It is the one whose engineering decisions agree with one another.
Material affects cutting.
Cutting affects residual stress.
Residual stress affects bonding.
Bonding affects appearance and strength.
Thickness affects stiffness, fit, weight, and hardware.
Temperature affects dimensional movement.
Packing determines whether all that work survives the trip to the buyer.
That chain is what separates routine acrylic box fabrication from engineered production.
A box can be transparent and still hide a surprising amount of manufacturing risk.
The job is to remove that risk before mass production—not inspect it after 500 pieces have already been built.
FAQs
What are custom acrylic boxes?
Custom acrylic boxes are made-to-size PMMA enclosures engineered for display, storage, protection, merchandising, organization, or presentation.
Unlike stock boxes, dimensions, thickness, color, joints, lids, hardware, printing, engraving, and internal compartments can be designed around a specific product or application.
Is cast or extruded acrylic better for acrylic boxes?
Neither is automatically better; the choice depends on fabrication, tolerances, cost, appearance, loading, and end use.
Cast acrylic can offer advantages for machining, heavier gauges, and certain demanding applications. Extruded acrylic generally offers tighter thickness tolerance, lower cost, and faster cementing and thermoforming.
Can laser-cut acrylic be solvent bonded?
Yes, but laser-cut bonding edges need careful process control because laser cutting can leave residual thermal stress.
ACRYLITE warns that stressed laser-cut edges can be susceptible to crazing when exposed to solvents. Annealing, machining away the stressed zone, or changing the joining process may be appropriate.
Why do acrylic box joints develop bubbles?
Bubbles can result from poor edge fit, rough surfaces, insufficient cement flow, movement during bonding, or incorrect joint preparation.
Clear bonding depends on flat mating surfaces, controlled solvent application, fixturing, and enough cure time. Cosmetic joint quality should therefore be treated as a process-control requirement.
Why does acrylic craze after bonding?
Crazing is commonly associated with tensile or residual stress interacting with solvents or other incompatible chemicals.
Cutting, drilling, bending, flame polishing, laser processing, or poor machining can introduce stress before bonding. The defect may only become visible after the solvent contacts the stressed region.
Should bonding edges be polished?
Not necessarily. A bonding edge should be flat, clean, square, low-stress, and suitable for the selected cementing process.
ACRYLITE advises against polishing edges intended for cementing because polishing can round the edge, and flame-polished surfaces may craze when exposed to solvent cement.
How thick should a custom acrylic box be?
Thickness should be selected from box dimensions, unsupported span, loading, access method, hardware, appearance, and shipping conditions—not from a single standard rule.
A compact countertop box and a large display enclosure may require very different structures even when they serve similar visual purposes.
What information should I send an acrylic box manufacturer?
Send dimensions, application, material preference, thickness, quantity, joint style, lid or access requirements, hardware, branding, environmental conditions, and acceptance criteria.
A dimensioned drawing is preferable. Clearly identify whether dimensions are internal or external and which measurements affect mating components.
How transparent is clear acrylic?
Some high-quality clear acrylic grades transmit about 92% of visible light.
For example, ACRYLITE reports 92% light transmission for its colorless smooth extruded acrylic sheet. Finished-box appearance still depends on machining, scratches, bonding, polishing, cleanliness, and joint quality.
Does acrylic expand with temperature?
Yes. Acrylic’s thermal movement can be significant enough to affect large enclosures and tight-fitting hardware.
ACRYLITE reports that its extruded sheet expands and contracts three to eight times as much as glass or metals, with a coefficient of 0.00004 in./in./°F.
Aurora Peng
Aurora Peng is Co-founder and an acrylic fabrication specialist with over 15 years of experience, guiding custom product development, production and quality for clients across the US and Europe.


 English
 French
 German
 Portuguese
 Spanish
 Dutch
Dutch Italian